![]()
Date of most recent changes to this page: 6/7/2013
866-435-7473
Managed care CD's must be made here.
 |
click CD Update Procedure for Traditional plans |
|
click CD Update Procedure for Managed Care plans |
| click Web Update Procedure for Traditional plans |
| click Web Update Procedure for MC plans |
|
click Linking a patient to Trojan |
|
click Install a vendor initial load |
|
click Softdent Errors |
|
click Viewing Trojan Outside patient files |
|
click Viewing Trojan Inside patient files |
|
click Printing Trojan Plans |
|
click Can't view a Trojan Plan Number |
Note: A message may or may not come up stating Record is locked by another user, if it does just click <OK>
All other
computers must be completely out of Softdent during the entire update process.
This could take some time to process.

1. Check the CD
for damage that may have been suffered in shipping.
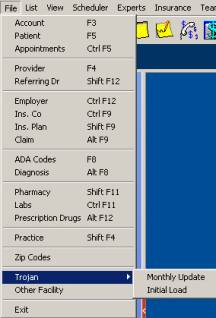
2. From Softdent
main screen, choose File.
3. Touch Trojan
(near the bottom).
4. Click Initial
Load.
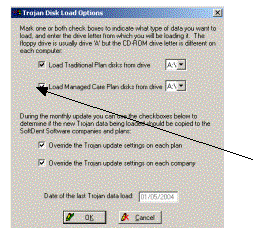
5. Uncheck
Load Managed Care Plan Disks
uncheck Load
Traditional Plan Disks
6. Make sure Enter
Disk Drive to Load from is D (or whatever
7. Click <OK>.
Screen prompts user to insert disk #1 <OK>
 |
|

| File Error 22 Invalid Argument | This is during the processing of an update. | Refer client to Softdent Support. | ||||||||||||||||||||||
|
The program index_mcline... 1131 Error #15 not a table error log |
error occurs when access managed care in through SoftDent | Refer to Softdent Support | ||||||||||||||||||||||
| Unable to access Trojan Stand Alone from Softdent Main menu |
Main menu, F10, Edit. The following should appear
|
|
||||||||||||||||||||||
| Frozen During Update | Is this during copying? | You can safely CTRL + ALT + DEL and try a new set of updates or try on another computer | ||||||||||||||||||||||
| Is this during processing? | Once it starts processing, the vendor program is working. We do not know how to safely exit this process and not damage data. Refer to their vendor support. | |||||||||||||||||||||||
| Cannot print hard copy of benefits. | Check version of Softdent. | V8.0 and lower cannot print benefits. | ||||||||||||||||||||||
| REC in error message |
|
|||||||||||||||||||||||
| Trojan plan is gone from the Softdent plan list |
|
|||||||||||||||||||||||
| Trojan Notes. Record in use by another user | Shows during the update. Check that no one is in fact in the Softdent during the update. | Computer may need to be restarted. Refer to Softdent support. | ||||||||||||||||||||||
| Deductible shows 9999 in the patient files but fine in the data outside of patient files | This is the way Softdent integration interprets a zero deductible | Per Softdent support (8/10/04) program defaults to certain coverage depending on the plan type. The office can set up default coverage if they do not like that it defaults to 100% coverage. Office can call Softdent support for assistance. | ||||||||||||||||||||||
| This record was not found. It was probably deleted by another user. | comes up during processing the update | Click okay. The update will continue. | ||||||||||||||||||||||
| Estimating not working properly | Check the selection they have for estimating types. They can select commercial ins or PPO ins. if they have the incorrect one selected the estimating will not be correct. |
Viewing Trojan Outside patient files
Viewing Trojan Inside patient files
Traditional Plans
Managed Care Fees from Softdent (Chasity gets credit for finding this)
You need the fee schedule for Plan CAA 50
Start At: should read CAA50
End At: should read CAA50
MAKE SURE TO PUT CHECKS FOR INCLUDE LIMITATIONS AND FOR PRINT PLANS ONLY WITH FEE SCHEDULES AND BOOOOOMMMM! U GOT IT!
Web Update Procedure for Traditional plans
We have a number of offices that are updating their Trojan plans in Softdent through a web download and it is working just fine. This is not something that we set up for each new office, but will do for an office that needs to get updated all at once or that is savvy enough to run these updates without help.
Updating through the web requires Trojan Support to do a special set up to "trick" the Softdent program into thinking they have a new CD drive. Set Up
Downloading the update files
|
|
Double-click the Trojan
Communicator icon. |
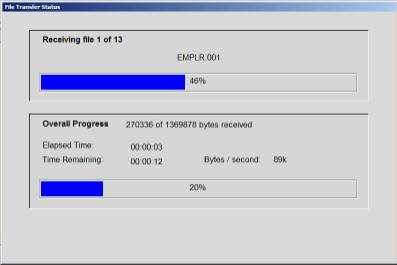
The file transfer status
screen will show the progress as each file is downloaded.
The time remaining is indicated.
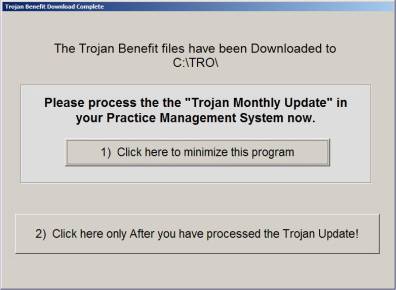
When the download is
complete you will be prompted with this screen:
 Click
option 1.
Click
option 1.
This will minimize the
Trojan Communicator program and
allow you to update benefits in your Practice Management System.
|
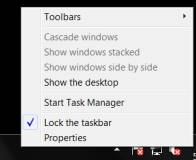
Right
click any blank space on the task bar to get the pop up menu. Left
click the “Start Task Manager” or “Task Manager” option on
the menu. (Click
Options at the top and be sure the “Always on top”
option is selected.) |
|
|
|
|
|
Move
the Task Manager window to the bottom right or left of your monitor. |
|
|
|
|
|
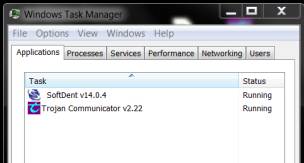
In
the Task Manager window only Trojan Communicator and Softdent should be
showing in the Applications tab. |
|
All other computers
must be completely exited from Softdent during the entire update process. This
could take some time to process.
|
2. Touch Trojan
(near the bottom).
3. Click Monthly Update.
4. Uncheck
Load Managed Care Plan Disks for
updating to update the traditional plans.
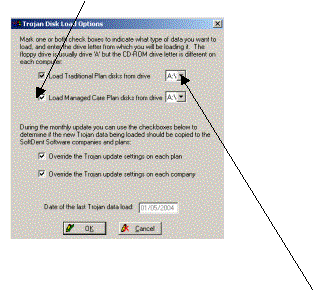 |
5. Click on the down arrow to chose the drive T:\ (confirm what drive letter by looking in My Computer and seeing what drive is the TRO folder)
6. Click <OK>.
7. You will be prompted to insert the first disk into the drive.
Just, click <OK>.
Program will copy the benefit files.
8. When prompted to load another Traditional Plan disk,

select No
**Note: The Task Manager
window may show the Softdent program as “not responding.” So long as it says
that on only one line and the CPU usage percentage number is moving, the program
is still working. If 2 lines in the Task Manager show the program not
responding, the update stalled.
Now that your Practice
Management System has been updated you will need to finalize the Trojan Benefit
Download Process.
|
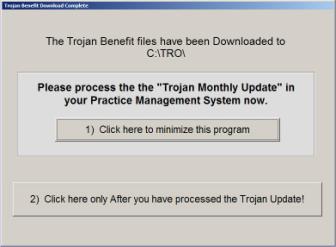
Click on the Trojan
Communicator program that was minimized to the Windows Task Bar (at
the bottom of the screen). |
|
You will be brought back to this screen.
 |
|
 You
are now ready to select option 2) Click here only after you have processed
the Trojan Update.
You
are now ready to select option 2) Click here only after you have processed
the Trojan Update.
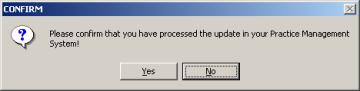
Confirm that you have
processed the update by clicking Yes.
Double click on Computer
or My Computer on your desktop or in your Start menu. Open the C:\
drive. Open the “TRO” folder. In
the “TRO” folder you will need to right click on the “diskdone.dat”
file and then scroll down to delete and left click. It will ask you to confirm you want to delete it.
Web Update Procedure for MC plans
We have a number of offices that are updating their Trojan plans in Softdent through a web download and it is working just fine. This is not something that we set up for each new office, but will do for an office that needs to get updated all at once or that is savvy enough to run these updates without help.
Updating through the web requires Trojan Support to do a special set up to "trick" the Softdent program into thinking they have a new CD drive. Setup
Web Update Procedure in on Clerk Files Page
Set up for Downloading PPO plans for updates
Set up for Downloading MC plans for updates